A roof protects against rain, snow, sunlight, and extremes of temperature. It is usually constructed of a variety of materials.
The process of putting on a new roof or re-roofing requires knowledge of the structural framework, installing roof decking or sheathing, underlayment, and various layers that protect against water leaks. It is also labor-intensive and carries health and safety risks.
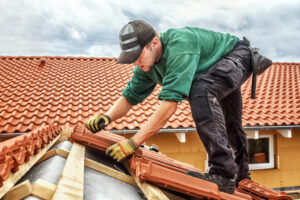
The shingles that cover your roof are an important part of its design. Not only do they protect your house from water and add to its visual appeal, but they also divert rainwater away from the foundation of your home. Without this essential function, water would slowly seep through your walls and cause extensive damage to the house’s structure.
Roofing shingles are usually made from either wood or asphalt. The wood shingles are sawed from natural materials such as red cedar or pine and may be treated with chemical preservatives to ensure long life. Depending on the quality of the shingle, it may also be rated by its fire resistance class. The asphalt shingles are made from a mix of asphaltic and other chemicals that make them water resistant, while at the same time allowing them to meet specific fire ratings.
In order to give the shingles added strength, they are laminated together. During this process, the layers are separated by a layer of paper to help prevent tearing. These shingles are then given a waterproof coating. This is achieved by blowing hot air through the shingle to increase its viscosity. This helps the shingle to remain adhered during the installation process, and also through weather events and other stresses.
The shingle base is coated with a variety of color options to improve its appearance. These coatings can include ceramic-coated mineral granules, glass fragments or slag (a byproduct of ore smelting). The granules act to protect the shingle from UV radiation and increase its fire resistance rating. The granules are glued to the shingle with an asphaltic adhesive.
When a roof leaks, it most commonly occurs where the shingle layer is penetrated or interrupted by a wall or other feature such as a dormer. These special areas require flashing to create a water-shedding barrier. For this reason, it is imperative to properly install these items before the shingles are installed.
If you have an ice and water membrane already installed on your roof, it should be flashed at this point as well. This is done to create a water-shedding barrier around the entire perimeter of your roof, especially at the eaves. It is also a good idea to have any valleys on your roof flashed at this time as well.
Underlayment
Underlayment is a material placed directly on your roof deck and works as an additional layer of protection. It helps to keep rainwater from infiltrating your home during a storm and supports the work of shingles or other roofing materials. Underlayment comes in a variety of options and can be made from either felt or synthetic materials. It can also be breathable or non-breathable depending on your ventilation requirements.
Felt underlayment is one of the oldest types of roofing underlayment. Often referred to as tar paper or felt paper, it is designed to help resist water damage and is typically more affordable than synthetic underlayment. However, it is not fully waterproof and requires the primary roofing material to cover it in order to be effective. It is also prone to tearing, and it can absorb moisture and wrinkle.
Synthetic underlayment is a more modern option that offers more reliable performance and product longevity. This type of underlayment is designed to be more resistant to weathering and can be used for a wide range of applications. It can be more expensive than felt, but it is more durable and able to withstand the elements. Often, it is used for residential applications and is required by many shingle manufacturers in order to be eligible for better warranty protection.
Some underlayment materials offer fire resistance as well. This is important for homes in high-risk areas where fire is a concern. Other underlayment materials are designed to prevent the occurrence of roof leaks by preventing condensation. In addition, some underlayment materials provide a high-traction surface that can make it safer for roofers to walk on the roof.
Once the underlayment is in place, a contractor will attach it to the roof deck using fasteners. Depending on the underlayment type, the fasteners may come in the form of staples or plastic caps. The latter are typically used in high-wind areas and on roofs with synthetic underlayment as they offer more protection against wind damage.
If your underlayment is damaged, it is important to have it repaired as soon as possible. This can protect your roof from serious damage and prevent the need for a full roof replacement.
Flashing
Flashing is a sheet or strip of water-resistant material installed at critical areas where roofs intersect and project, like chimneys, dormers and skylights. Its purpose is to stop moisture from seeping under roof shingles, which can cause mold and mildew, encourage pest infestation and lead to rot. When properly installed, it prevents leaks and makes a home’s outer envelope more durable.
Roof flashing is usually metal, ranging from the very expensive copper to less costly aluminum. It comes in various shapes and sizes, all designed for specific roofing features, such as dormers and chimneys. Metal flashing is more durable than plastic and can last the lifetime of a roof, but even it requires special treatment to stay protected from corrosion.
A flashing’s design is simple: it lines the joint where a roof meets something, such as a wall or chimney. Professional roofers install it in several layers, which overlap each other to create a strong waterproof seal. A flashing is also sometimes made of rubber or silicone for easier expansion and contraction with changing weather conditions.
There are four common types of roof flashing: apron flashing, step flashing, valley flashing and counter flashing. Apron flashing is a long piece of flashing, shaped as an L to fit the base of a penetration or wall. It’s typically nailed to the roof and secured in place with shingle cement, but it can also be built up over the top of the shingles.
Step flashing is similar to apron flashing but is used where dormers, chimneys and other protrusions meet a roof. It consists of rectangles of flashing that are bent into an L-shape and nailed to the roof, then overlapping each other. The bottom of each “L” is cut into the slope of the roof, and the upper end is cut away from a dormer or chimney wall.
Valley flashing is used to line the area of a roof where two slopes meet and diverts running water into gutters rather than toward the walls of a building. It can be made from a single piece of continuous flashing or multiple pieces of step flashing that are nailed together in “steps” to form a V-shaped channel.
Ventilation
Whether you’re building a new home or reroofing an existing structure, ventilation is one of the most important decisions when designing your roofing system. Ventilation is critical for energy efficiency and roof longevity. The proper ventilation system helps regulate the temperature of your attic and home, which reduces the load on your air conditioning, as well as improving indoor air quality.
Ventilation is a combination of intake and exhaust vents located at key points around your attic and roof structure. Intake vents draw in cooler outdoor air while exhaust vents at the peak of your roof allow warm internal air to escape. Together, the intake and exhaust vents create a cycle of airflow through your roof system that keeps your attic and home properly ventilated year-round.
The general rule of thumb for roof ventilation is that a home needs one vent for every 300 square feet of attic space. However, this number may vary depending on climate and attic insulation. For example, a home with an attic vapor barrier or insulation that isn’t air sealed will need twice as many vents as a home without either of these.
There are several different types of roof vents that can be installed to help achieve a balanced ventilation system. One of the most common is the ridge vent, which is installed by cutting a hole in the attic floor and then installing a flexible ridge vent over top. The ridge vent works by using gravity and natural convection to pull warm air out of your attic, keeping it cooler than the rest of the attic.
When properly designed, the venting systems for your roof and attic should be custom-balanced. We never recommend combining exhaust vents, like power vents, with intake vents, such as gable or can vents. Combining these different ventilation styles can cause competing vents to short-circuit each other, leaving the attic unventilated and your home susceptible to moisture build up, which can damage wood framing and lead to mold, mildew or rot.