After a hail storm, you may notice damage to your roof. Tiny holes in shingles and worn sealant around vents and other protrusions should be repaired right away to keep water and other unwanted elements from getting into your home.
Repairing a roof is surprisingly simple. A professional roofer follows the same steps to fix roofing materials. Click https://www.orangecountyroofingfl.com/ to learn more.
Flashing is a piece of metal, often galvanized steel, installed on a roof to prevent leaks where it meets different structures like chimneys, walls, and window openings. It is typically bent and cut to fit the application and is sealed with caulk. Flashing is a critical part of the roofing system and should be checked periodically to ensure it does its job. Having a professional inspect and repair any problems with the flashing can help prevent leaks from occurring in your home and save you costly repairs later.
Depending on the material, flashing can be made from aluminum, copper, or galvanized steel. Each material has advantages and disadvantages, but aluminum is the least expensive option, while copper is more durable. While flashing can be found at most hardware stores, it is most commonly hand-bent by a roofing contractor to fit the specific application. Flashing should be inspected periodically and replaced if it becomes corrupted or damaged.
If your flashing is in good shape, it can flex as the house expands and contracts during changing seasons. This is important to avoid cracking or breaking the flashing, which can cause water to seep into the home and rot the wood framing inside. Long flashing pieces may have trouble flexing and are, therefore, often designed with built-in expansion joints. Shorter pieces can be easier to install, but they must be bent carefully to line up with the other flashing.
Various types of flashing are used to protect different areas of the roof and walls. These include corner flashing, which is used to seal the joint between a wall and the roof; step flashing, which uses rectangles of flashing that are bent into an L-shape to fill in gaps at corners on sloped roofs; and dormer flashing, which is used around dormer windows or other projections on sloping roofs.
Checking the flashing on a roof can be done from the ground with binoculars or by walking the perimeter of your house. A professional building inspector can also perform this inspection and recommend necessary repairs.
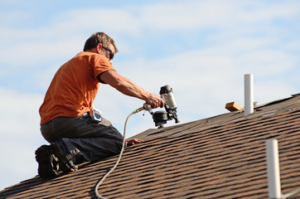
Whether from sudden severe storms, prolonged cool weather, or simply age and wear and tear, the shingles on your roof take a beating throughout the year. No wonder they often require repair or replacement, especially when the damage is in a visible part of the house. When you’re on a ladder inspecting the damage, look for shingles that have loosened or are missing altogether. Look also for cracks, warping, buckling, or discoloration in the area of the damaged shingle.
Loose shingles are a common problem, and fortunately, they’re usually easy to repair. A flat pry bar or a putty knife is ideal for getting under shingles to separate the adhesive and expose the nails that hold them. If you can separate the adhesive underneath a shingle and pull it up, you can usually remove the nails using the claw of your hammer.
When you’re ready to replace a damaged shingle, first see if you have any leftovers from the last time the roof was worked on. If you still need to, purchase a bundle of standard 3-tab shingles at your local home improvement store or lumberyard. You’ll be best served by choosing a shingle that closely matches the existing ones rather than trying to fit it exactly.
Then, when you’re on the roof climbing a ladder to do roofing repair, be sure your ladder is secure, and someone’s at the base to assist if needed. Start at the farthest edge of the roof and work your way to the damaged area. If you’re replacing a shingle in a highly visible part of the roof, consider retailing a new, slightly off-color shingle from a less visible part of the roof to disguise the repair.
Once you’ve got the old shingle off, install the new one. Nail it in place, securing the nails with galvanized roofing nails. Then, coat the top of the new shingle with asphalt roofing cement and spread a little extra over the corners to help glue them down. If you’re repairing a ridge or hip shingle, use the same process, but remember to cover the nailheads with more cement.
Roof vent boots are flashing that seal the gap between your roof and a pipe vent. They are available in different materials, including rubber, silicone, galvanized steel, and lead, and they can be either vented or non-vented. However, they accomplish the same goal, which is to protect the pipe from water infiltration.
While you may be able to purchase plastic, rubber, or silicone boot flashing from your local home improvement store, you’ll find that the best material for a roof vent pipe is often made of metal. These products are designed to last a long time, especially when properly installed. However, it’s important to note that you should only attempt to replace a pipe vent with a permit if you live in a community with strict building codes.
A leaking or poorly installed roof vent pipe can lead to serious problems down the line. A faulty or worn-out vent pipe can allow water to enter your attic and compromise the integrity of your roof. If this happens, it can cause rot, mold growth, and other structural issues in the interior of your home.
You can recognize a leaky roof vent by looking for water stains in your attic and walls, especially around the vent pipes. In addition, you may notice that shingles are curling or peeling, as well as discoloration. It’s best to have your roof inspected by a professional before these signs occur so they can address them before they become serious.
You can prevent leaks and damage by repairing your vent pipe as soon as you notice any issues. However, if you want to avoid taking the risk of working on your roof, leaving this job to a roofing repair specialist is always recommended. We can also provide the best waterproof sealant to keep your roof intact for years. Contact us today to schedule an appointment.
We look forward to helping you protect your home from costly repairs and other damage.
Sealant prevents moisture from passing through the areas of your roof that can be vulnerable to leaks. It can be a part of a roofing repair project, or it may be used as a preventative measure. Typically, it is installed in spots exposed to moisture and wind.
Roof sealants are similar to caulks but offer more specialized benefits. They are also designed to meet various standards for protecting roofs. Sealants generally have a longer lifespan than caulks and will provide better protection.
There are five types of roof sealants, each suited for specific purposes. Each type has a distinct life expectancy, depending on the materials it is made from and its ability to withstand outdoor elements like rain, sun, snow, and UV rays.
For example, silicone sealants are very durable and long-lasting. They are often used to seal the perimeter of a roof or as an alternative to caulking in certain areas, as they can be applied quickly and will not dry out. On the other hand, some rubber sealants will only last for a few years.
While every roof sealant offers some level of water resistance, some are more effective than others. For example, polyurethane sealants can protect a roof from moisture and wind, but they must be applied in several layers for the best results. It is important to consult your manufacturer’s instructions and thoroughly clean any area where you intend to use the sealant.
Some sealants are reflective, which can help to reduce the amount of sunlight that heats a home and decrease air conditioning use. This can significantly cut down on your electricity bill. Some of the most popular reflectivity sealants include acrylic and silicone.
The type of sealant you choose will depend on your budget and the needs of your roof. Some of the most common sealants are made from silicone, acrylic, butyl, and polyurethane. Acrylic and silicone sealants are the most versatile options, as they can be used for various repairs and resist cracking and shrinking.